The first page gives you a list of all the registered users on your system.

This gives you a bird's eye view of your users, with some details thrown in which you can use to sort and search accounts:
- ID. The unique ID attached to the user.
- Username. The user name used to log-in to your account.
- Email. The email adders the users used to register in your program.
- Balance. How much the user has.
- Seen. The last time that user online.
- Join. User sign-up date.
- Status. Indicates whether the user is active or not. You can disable an account by choosing "Inactive" on status selection.
Creating a new user account
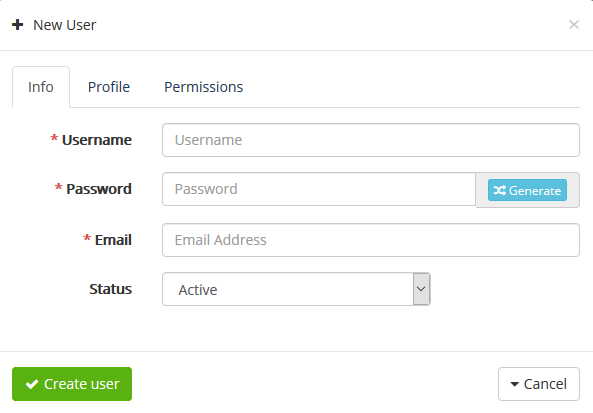
To create a customer account manually, select "New user". A form will appears.

Fill out the user's information through tabs:
Info tab
- Username. This is essential:The user name used to log-in.
- Password. Choose a password, at least 3 characters long or click on "Generate" button a new Strong password will appears.
- Email. The email address is used for log-in.
- Status. The unique ID attached to the user.
Profile tab
Complete the personsl information: full name the name is used in the confirmation emails that Licenses Manager sends, phone, country, city and address.
Permissions tab
Through this tab, you determine user permission if the is system user, click on "System User" box. Select from all permission template you have created before in permissions templates page under system menu, or click on the small box beside required permission.
Viewing a user's information
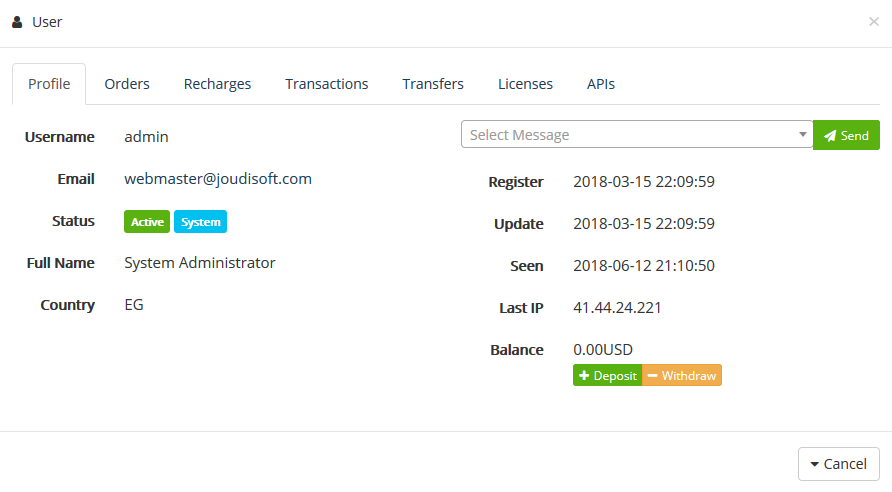
In the case where you would like to have more information on a given user, you can click on the "view" button, located at the end of the row in the user's list. A new page appears.

Tabs
Provide you with some key data on the user.
- Profile. This tab shows you a summary for user as: username, Status, E-mail Address, Full Name, Sign-Up Date, Date of last visit, date of last update, last login IP, last FP and balance.
- Deposit. To deposit money to user's balance, click on "Deposit", write money for deposit and finally click on confirm, user’s balance will increase with deposit amount.
- Withdraw. Also license manager enable user to withdraw from user's balance, just press on "Withdraw", write money amount and finally click on “Confirm”, user’s balance will decrease with withdraw amount.
- Orders. This tab show all user's orders which user made with all information about this orders. ,And you can manage orders by clicking on” manage” button located at the end of the row in the order's list. A new page appears.
- Recharges. This tab give you a list of all recharges user have been happened and you make manage recharge if you need.
- Transaction. This tab gives you a list of all transaction users have been done with all information especially to transaction and you make manage it if you need.
- Transfers. All transfer user has done such as deposit, withdraw, payment and so on, in detailed.
- Licenses. Show you all licenses user used them.
- API. API tab show you all API using by user, you can manage any existing one or create new API by clicking on "New API" button as you need.
You can select a pre-written message. Pre-written messages can be saved and used multiple times, saving you the hassle of writing them over and over again. If you would like to send one of these messages, select it from the drop-down list. You can then add further details to the pre-written message if needed.
Start manages order as needed, and also can show transaction of this order from transaction tab.
Searching for a user
The search method consists of entering the information you have into the Licenses Manager search bar, which is found in the top of your back office.
Also you can filter user with user's status (active or inactive), verified or not and role (system or customer).
